Measuring Guidlines
Inside Mount
It is industry standard for a blind fitting into a window reveal to sit flush with the front of the reveal. The factory will make the appropriate deductions for the product type and fixing method.
Width
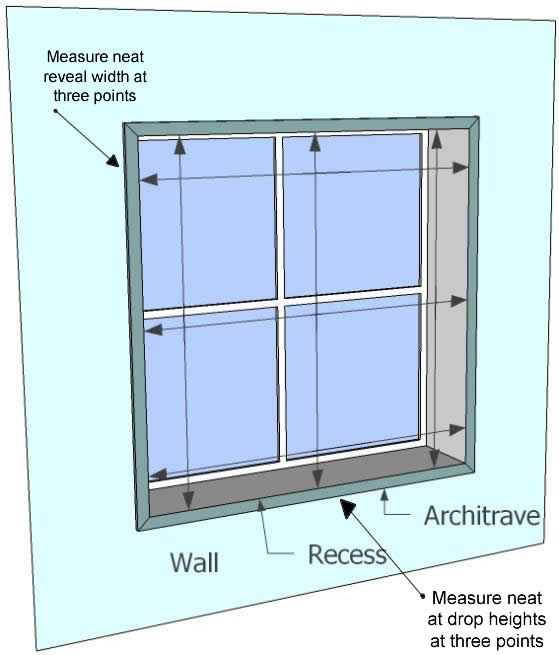
▪ Measure neat internal width of the reveal
▪ Measure at three width points – top middle and base of reveal. This will be the bracket to bracket measurement. Use the smallest width measurement
Drop
▪ Measure neat internal drop of the reveal
▪ Measure at three drop points – left, middle and right of reveal. It is not critical to use the shortest drop for this product but client should be advised if window is “out of square”. Blinds can only be made square so if window is out of square it may result in irregular light gaps around the blind. Advise your client.

Note – The blind fabric will be narrower than the bracket to bracket measurement. Refer to “Side/Light Gap” notes in Specifications. If the blind is an inside mount there will be light gaps on each side of the blind.
Outside Mount
Blind Fitting onto Architrave
Width
▪ Measure from outside edge of architrave to outside edge of opposite architrave at three width points. Use the largest width measurement
Drop
▪ Measure from top of architrave to base of lower architrave or floor. Measure at three drop points. Use the longest drop measurement

Note – The blind fabric will be narrower than the bracket to bracket measurement. Refer to “Side/Light Gap” notes in Specifications. Some architrave will be visible on each side of the blind. Measuring and installing the blind on the wall past the architraves will avoid the architraves being visible on the sides when the blind is drawn down (check for solid fixing point for brackets).
Outside Mount
Blind fitting onto wall
Width (No architrave present)
▪ Measure minimum of 50mm past each side of window opening at the top
Width (Architrave present)
▪ Measure minimum of 30mm past edge of the architrave
Depth (No architrave present)
▪ If fitting blind into plaster or concrete – measure minimum of 70mm above window opening to a minimum of 50mm below window opening, or to the floor
▪ If fitting blind into brick, measure from the top of the first brick to a minimum of 50mm below window opening, or to floor
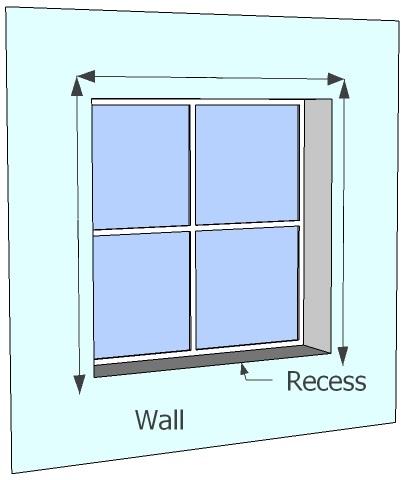
No Architrave

With Architrave
Linked Roller Blinds
Inside &Outside Mount
- Use standard measuring principles for Inside and Outside Mount
- Measure each blind individually, and provide these measurements. The factory will make the appropriate deductions for the link bracket. Indicate on paperwork that blinds are linked
- Always measure and record the blind sizes starting from left to right across the window area
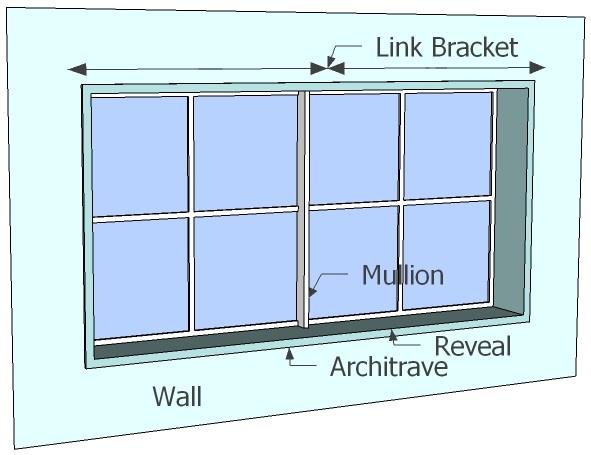
DO NOT measure the complete area to be covered and then divide by the number of blinds, as the blinds may not always be the same size.
Link the blinds in front of the window mullion or framing where possible. This is where the gap between the blinds will be, and will provide a better appearance and assist in light blocking.
Note – Always have windows/ doors closed when measuring, to ensure the blinds line up with the mullion/ frame.
Butting Blinds
Blinds fitting side by side not using link bracket
- Apply the same measuring principles as for the Linked Roller blind and state on the paperwork that the blinds are ‘Butting together’. There will be a gap between the blinds, refer to the ‘Side/ Light Gap’ notes in the specifications
Corner window
Inside Mount
Follow standard measuring principles and check that the reveal is deep enough to fit the roller system that you are using. Refer to the projection notes in the specifications. Check for anything that may impede operation of blind e.g. window locks.
Option One (Through Blind with Butting Blind)
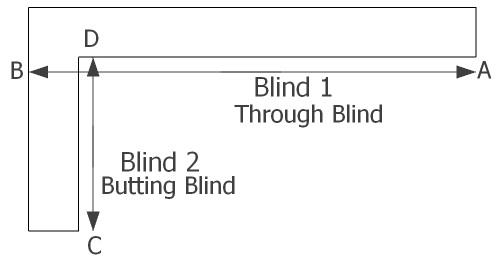
- Determine which window should be the main window for privacy, light block or aesthetic reasons. This will be the “through” blind. The gap between the blinds will sit in front of the window that the “butting” blind covers
- Measure at the front of the reveal
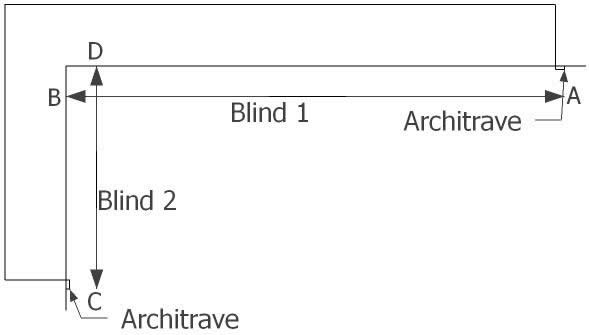
- Measure the width of Blind 1 from point A to B
- Measure the width of Blind 2 from point C to D at the front of the reveal. Both blinds will sit flush with the front of the reveal
Option Two (Butting Blinds)
- Measure at the front of the reveal
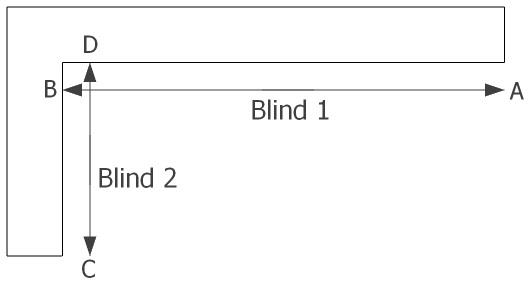
- Measure the width of Blind 1 from point A to B
- Measure the width of Blind 2 from point C to D at the front of the reveal. Both blinds will sit flush with the front of the reveal
Note
- Front roll will provide better coverage and a smaller corner gap than back roll. A gap in the corner where the blinds meet cannot be avoided. Advise your client
- It is not advisable to situate the control chains in the corner, as they will be difficult to access for operation
- Thick fabrics and/or large drops may result in the fabric protruding past the mounting bracket when rolled up. Please allow for this when calculating deductions
- Option one provides better light block, as there will be less gap where the ‘butting’ and ‘through’ blinds meet
Outside Mount
Option One (Through Blind with Butting Blind)
- Determine which window should be the main window for privacy, light block or aesthetic reasons. This will be the “through” blind, as the gap between the blinds will sit in front of the window that the “butting” blind covers
- Measure blinds 1 and 2 across the outside face of the corner window, along the surface to which the blinds will be fitted
- Measure the width of Blind 1 from A to B by measuring from the outside edge of the architrave to the corner
- Measure the width of Blind 2 from C to D by measuring from the outside edge of the architrave to the corner
- Deduct the projection of Blind 1 from the Blind 2 width measurement. Refer to the Easy Reference Guide for product projections. Blind 2 will “butt” up to the front of Blind 1

Note: Refer to measuring guide for Outside Mount Blind Fitting onto Wall if there are no architraves or if you require blinds to fit onto wall.
Option Two (Butting Blinds)
- Measure Blinds 1 and 2 across the outside face of the corner window, along the surface to which the blinds will be fitted
- Measure the width of Blind 1 from A to B by measuring from the outside edge of the architrave to the corner
- Measure the width of Blind 2 from C to D by measuring from the outside edge of the architrave to the corner
- Both Blind 1 and Blind 2 require the projection to be deducted from each width measurement. Refer to the Easy Reference Guide for product projections

Note
- Refer to measuring guide for Outside Mount Blind Fitting onto Wall if there are no architraves or if you require the blinds to fit onto the wall
- Front roll will provide better coverage and a smaller corner gap than back roll. A gap in the corner where the blinds meet can not be avoided. Advise your client
- It is not advisable to situate the control chains in the corner as they will be difficult to access for operation
- Option one provides better light block, as there will be less gap where the ‘butt’ and ‘through’ blinds meet
- Where architraves are present, measurements should be taken on the face of the architrave
Bay window
Inside Mount (135 Degree Bay Windows only)
There will be considerable light gaps in bay window corners between the blinds, as the Roller blind fabric is shorter than the bracket to bracket blind measurement.
Follow standard measuring principles, and check that the reveal is deep enough for the Roller blind system that you are using. Refer to the projection notes for this product in the specifications.
Width
- Measure blinds 1, 2 & 3 across the front of the reveal
- Measure from Point A to B
- Measure from Point B to C
- Measure from Point C to D

Note – This is the standard manner for fitting Roller blinds into a bay window. There are other options that may achieve increased coverage. You should discuss options with your installer. Front roll will decrease the corner light gaps.
Outside Mount (135 degree Bay Windows only)
Width
- Measure blinds 1, 2 & 3 across the outside face of the bay window along the surface to which the blinds will be fixed
- Measure from Point A (edge of architrave) to Point B
- Measure from Point B to Point C
- Measure from Point C to Point D (edge of architrave)
- If no architrave is present, add 50mm to side window opening widths

Note – Front roll will decrease the corner light gaps.
Take the following deductions from these measurements:
- Como Roller Blind
o Deduct 27mm from blinds 1 & 3 and deduct 54mm from blind 2 - Como2 Roller Blind
o Deduct 54mm from blinds 1 & 3 and deduct 108mm from blind 2 - Acmeda Roller Blind
o Deduct 27mm from blinds 1 & 3 and deduct 54mm from blind 2
Note – Bay windows in older homes often have considerable timber framing and moulding at the top of window frames so it is critical that you inspect where the blinds are to be fitted before you take measurements.
Roman Blinds
Single Roman Blinds
Inside Mount
It is industry standard for a blind fitting into a window reveal to sit flush with the front of the reveal. The factory will make the appropriate deductions for the product type and fixing position.
When drawn up the Roman Blind folds will sit back further than the headrail. This will vary depending on the drop and style of the blind, and could be as much as 70mm. Ensure that the reveal is deep enough.
Width
- Measure neat internal width of the reveal
- Measure at three width points – top, middle and base of reveal. Use the smallest width measurement, as the blind will be drawing up the length of the reveal and may rub or jam at narrowest point if the wider measurement is used
Drop
- Measure neat internal drop of the reveal
- Measure at three drop points – left, middle and right of reveal. Use the shortest drop measurement
- Advise client if window is out of square, as this can cause irregular light down the sides of the blind and/or across the base of the blind. The blind can only be made square
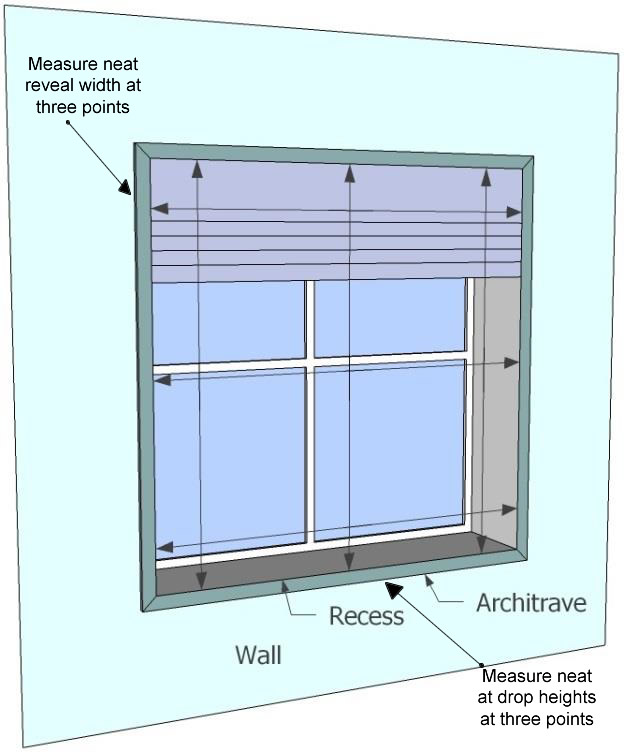
Note – When fully drawn up the Roman Blind will stack up to an approximate depth of between 300mm to 450mm. This will vary according to the blind drop and the operation system. Show the client the approximate stack depth in the reveal.
Outside Mount
Blind Fitting onto Architrave
Width
- Measure from outside edge of architrave to outside edge of opposite architrave
- Measure at three width points – top, middle and base of window. Use the widest width measurement. Add 20mm to overall width measurement to ensure no architrave is visible down the sides of the blind
Drop
- Measure from top of architrave to base of lower architrave or floor
- Measure at three drop points – left, middle and right. If blind is finishing at base of architrave, use longest drop and add a minimum of 30mm. If blind is going to the floor, use shortest drop
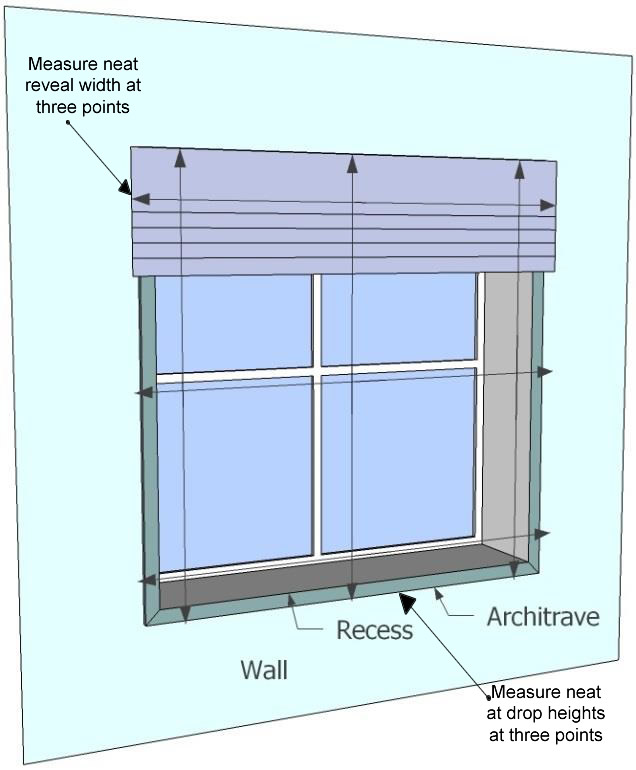
Note – When fully drawn up, the Roman Blind will stack up to an approximate depth of between 300mm to 450mm. This will vary according to the blind drop and the operation system. Blind will sit in front of the window area. Show the client the approximate stack depth in the reveal.
Outside Mount
Blind fitting onto wall
Roman Blinds are often fitted onto the wall above the window even if architraves are present. This is done to reduce the depth of the blind hanging in front of the glass when drawn up, and avoids hindering the light and view through the window. This is particularly relevant when blinds are fitting over doors, as the stack depth is likely to prevent easy walk through access if fitted onto the architrave.
Width (No architrave)
- Measure minimum of 50mm past the window opening at the top
Width
- Measure minimum of 30mm past each edge of the architrave
Drop
- If fitting onto plaster or concrete, measure a minimum of 70mm above the window opening to a minimum of 50mm below window opening, or to the floor
- If fitting into brick, measure from the top of the first brick, or from the top of a higher brick where required
Note – Roman Blinds will often be fitted 100mm to 200mm above the window opening.
Corner window
Some operational difficulties will occur with Roman Blinds fitted in a corner window application. Both blinds may not be able to be fully drawn up at the same time due to the fabric folds protruding past the face of the blind when drawn up. The drawn up blind may push into the other blind, causing it to sit incorrectly. As the blind is being drawn up it may rub the fabric of the other blind, resulting in some minimal wear to the fabric.
Refer to the Corner Window measuring for Roller Blinds as a guide. Refer to the Easy Reference Guide for the product projection that will need to be deducted from blinds if outside mount.
Butting blinds, rather than using a “through” blind can be a better option. There will be minimal light gap.
Bay Window
Some operational difficulties will also occur with Roman Blinds fitted into a bay window application. All blinds may not be able to be fully drawn up at the same time. If one or both of the side blinds are drawn up, the centre blind will only draw up to the base of the side blind. If the centre blind is drawn up, the side blinds will only draw up to the base of the centre blind.
It is recommended to use brackets to determine measurements for outside mount applications.
panel glides
It is very important to show your client where the panels will sit on the window and how much of the glass area they will cover. This factor may influence how many panels you decide on, as increasing the number of panels will decrease the width of each individual panel. When there is more than one blind in the same room area, it is advised to keep the panel widths (rather than the number of panels) as similar as possible to maintain consistency in product appearance. To determine an approximate width of the panel, divide the blind width by the number of panels.
Single Opening Panel Glides
Inside Mount
It is industry standard for a blind fitting into a window reveal to sit flush with the front of the reveal. The factory will make the appropriate deductions for the product type and fixing position.
Check that the reveal is deep enough for the track to fit into. Refer to the projection notes in the specifications. The depth required will vary with each different track size. Ensure there are no protruding window handles/locks etc. that will interfere with the sliding action of the panels.
Width
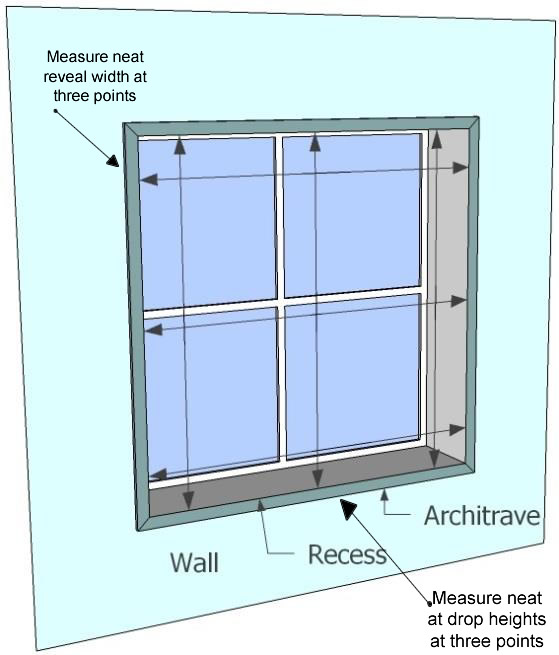
- Measure neat internal width of reveal
- Measure at three width points – top, middle and base of reveal. Use the smallest width measurement
Drop
- Measure neat internal drop of reveal
- Measure at three drop points – left, middle and right of reveal. Use the shortest drop measurement. Advise client if window is out of square
Outside Mount
Blind Fitting onto Architrave
Width
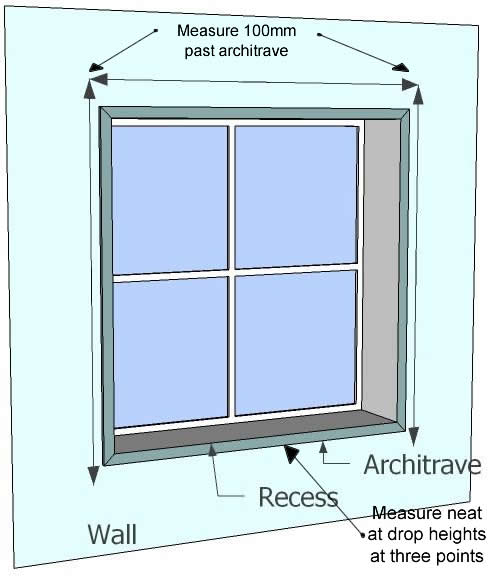
- Measure from outside edge of architrave to outside edge of opposite architrave
- Add a minimum of 100mm to each side. This provides better light block and privacy and ensures that no architrave is visible down sides of blind
Drop
- If going to floor, measure from top of architrave to floor. Measure at three drop points – left, middle and right of area. Use the shortest drop measurement. Advise client if the drop height varies across the area as this will result in an irregular light gap along base of blind
- If going to base of window, measure from top of architrave to the base of lower architrave. Add minimum of 70mm to drop to provide better light and sun block
Outside Mount
Blind Fitting onto Wall
Width
- Measure a minimum of 150mm past each side of the opening
Drop
- If fitting the blind into plaster or concrete – measure a minimum of 70mm above the window opening to a minimum of 100mm below the window opening or to floor
- If fitting blind into brick – measure from the top of the first brick to a minimum of 100mm below the window opening or to floor

Note – Outside mount Panel Glides can be extended past the window opening to have panels sitting in front of wall and not obstructing the window area. This is achieved by increasing the width of the Panel Glide to extend past the window on one side, or if centre opening, to extend past on both sides. Check for any obstructions e.g. light fittings.
Corner window
Refer to the Corner Window measuring for Roller Blinds as a guide. Refer to the Easy Reference Guide for the product projection that will need to be deducted from the “butting” blind.
Bay Window
Refer to the Bay Window measuring for Roller Blinds as a guide.
It is recommended to use brackets to determine measurements for outside mount applications.
vertical blinds
Inside Mount
It is industry standard for a blind fitting into a window reveal to sit flush with the front of the reveal. The factory will make the appropriate deductions for the product type and fixing position.
Check that the reveal is deep enough to fit the blind. Refer to the projection notes in the specifications. The depth required will vary with each different blade size, and must allow for the blade in the open position. Ensure there are no protruding window handles/locks etc. that will interfere with the operation of the blades.
Width
- Measure neat internal width of reveal
- Measure at three width points – top, middle and base of reveal. Use the smallest width measurement
Drop
- Measure neat internal drop of reveal
- Measure at three drop points – left, middle and right of reveal. Use the shortest drop measurement. Advise client if window is out of square
Outside Mount
Blind Fitting onto Architrave
Width
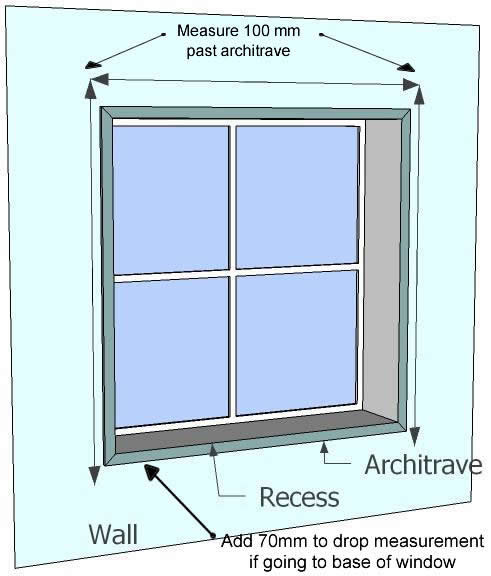
- Measure from outside edge of architrave to outside edge of opposite architrave
- Add a minimum of 100mm to each side. This provides better light block and privacy and ensures that no architrave is visible down sides of blind
Drop
- If going to floor, measure from top of architrave to floor. Measure at three drop points – left, middle and right of area. Use the shortest drop measurement. Advise client if the drop height varies across the area as this will result in an irregular light gap along base of blind
- If going to base of window, measure from top of architrave to the base of lower architrave. Add minimum of 70mm to drop to provide better light and sun block
Note – Ensure that there are no furnishings etc. sitting under the window that will obstruct the sliding or opening operation of the blades.
Outside Mount
Blind Fitting onto Wall
Width
- Measure a minimum of 150mm past each side of the opening
Drop
- If fitting the blind into plaster or concrete – measure a minimum of 70mm above the window opening to a minimum of 100mm below the window opening or to floor
- If fitting blind into brick – measure from the top of the first brick to a minimum of 100mm below the window opening or to floor

Note – Outside mount Vertical Blinds can be extended past the window opening to have blades sitting in front of the wall and not obstructing the window area. This is achieved by increasing the width of the Vertical Blind to extend past the window on one side, or if centre opening, to extend past on both sides. Check for any obstructions e.g. light fittings.
Corner window
Refer to the Corner Window measuring for Roller Blinds as a guide. Refer to the Easy Reference Guide for the product projection that will need to be deducted from the “butting” blind.
Note: For easy access it is recommended not to have controls on the corner. The “through” blind will need to be drawn back from the corner before rotating the slats.
Bay Window
Refer to the Bay Window measuring for Roller Blinds as a guide.
It is recommended to use brackets to determine measurements for outside mount applications.
venetian blinds
Single Venetian Blinds
Inside Mount
It is industry standard for a blind fitting into a window reveal to sit flush with the front of the reveal. The factory will make the appropriate deductions for the product type and fixing position.
Check that the reveal is deep enough to fit the Venetian Blind. Refer to the headrail information in the specifications. The depth required will vary with each different headrail size. Ensure there are no protruding window handles/locks etc. that will interfere with the operation of the slats.
Advise client if window reveal is out of square as this can cause irregular light down sides of blind and/or across base of blind. The blind can only be made square. The drop of the blind in the closed position will be your full drop measurement.
Width
- Measure neat internal width of reveal
- Measure at three width points – top, middle and base of reveal. Use the smallest width measurement
Drop
- Measure neat internal drop of reveal
- Measure at three drop points – left, middle and right of reveal. Use the shortest drop measurement. Advise client if window is out of square
Outside Mount
Blind Fitting onto Architrave
Width
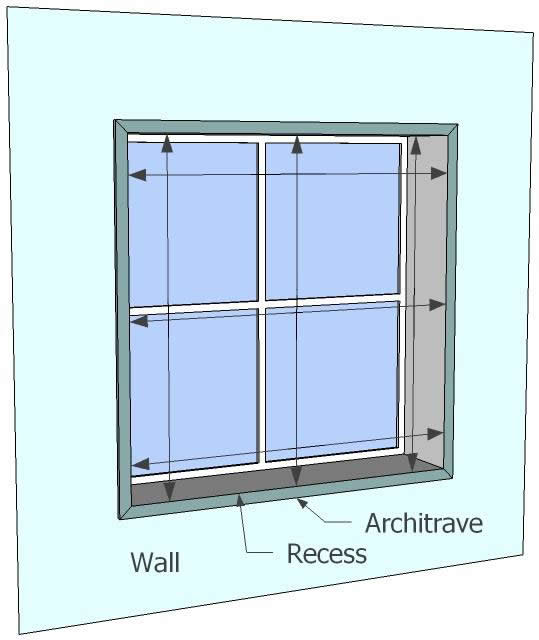
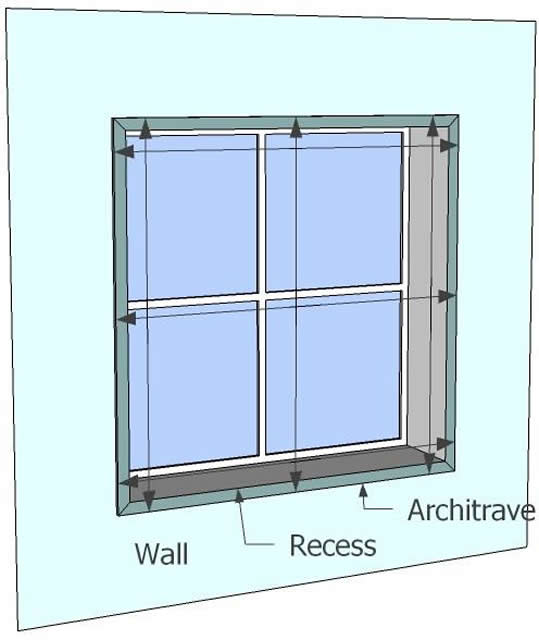
- Measure from outside edge of architrave to outside edge of opposite architrave at three points – top, middle and base
- Use the largest width measurement
Drop
- Measure from top of architrave to base of lower architrave or floor. Measure at three drop points
- If blind is finishing at base of architrave, use longest drop measurement. If blind is going to floor, use shortest drop measurement
Note – Ensure that there are no furnishings etc. sitting under the window that will obstruct the sliding or opening operation of the blades.
Cutouts
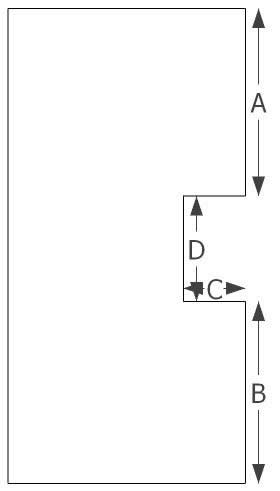
Cutouts may be required when a blind is fitted onto a door and the blind needs to clear the door handle or, for inside mount applications where there are a row of tiles fixed to the side of the reveal e.g. kitchen. Follow standard measuring principles.
- In addition to overall blind measurements, a diagram must be supplied with your order showing actual cutout dimensions
Note –Maximum depth of cutout is 100mm
Cutout Example 1
- Provide measurement from top of blind to top of cutout (measurement A)
- Provide measurement from base of blind to base of cutout (measurement B)
- Provide depth of cutout (measurement C)
- Provide height of cutout (measurement D)
Multiple Cutouts – Example 2
- Provide drop measurement from top of blind to top of tile – check that both sides have the same measurement (measurement A)
- Provide height of tiles (measurement B)
- Provide width measurement between the tiles (measurement C)

Corner window
Refer to the Corner Window measuring for Roller Blinds as a guide. Refer to the Easy Reference Guide for the product projection that will need to be deducted from the “butting” blind.
Note: For easy access it is recommended not to have controls on the corner.
Bay Window
Refer to the Bay Window measuring for Roller Blinds as a guide.
It is recommended to use brackets to determine measurements for outside mount applications.
zebra blinds
Single Zebra Blinds
Inside Mount
It is industry standard for a blind fitting into a window reveal to sit flush with the front of the reveal. The factory will make the appropriate deductions for this product type.
Width
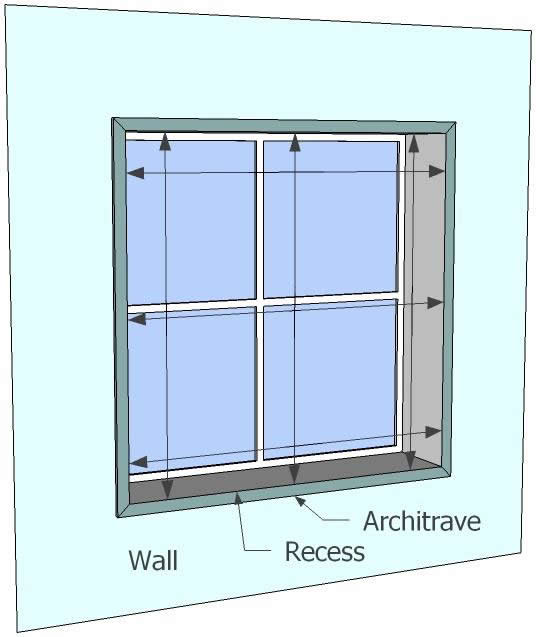
- Measure neat internal width of reveal
- Measure at three width points – top, middle and base of reveal. Use the smallest width measurement
Drop
- Measure neat internal drop of reveal
- Measure at three drop points – left, middle and right of reveal. It is not critical to use the shortest drop for this product but client should be advised if window is “out of square”. Blinds can only be made square so if window is out of square it may result in irregular light gaps around the blind. Advise your client
No Architrave
Note – The blind fabric will be narrower than the internal reveal measurement. If the blind is an inside mount there will be light gaps on each side of the blind. Advise your client.
Outside Mount
Blind Fitting onto Architrave
Width
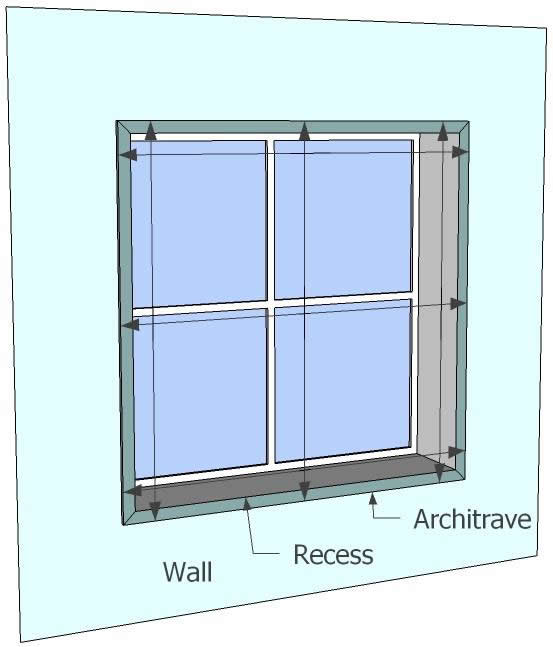
- Measure from outside edge of architrave to outside edge of opposite architrave at three points – top, middle and base
- Use the largest width measurement
Drop
- Measure from top of architrave to base of lower architrave or floor. Measure at three drop points. Use the longest drop measurement
With Architrave
Note – The blind fabric will be narrower than the architrave to architrave measurement. Some architrave will be visible on each side of the blind. Measuring and installing the blind on the wall past the architraves will avoid the architraves being visible on the sides when the blind is drawn down (check for solid fixing point for brackets).
Outside Mount
Blind Fitting onto Wall
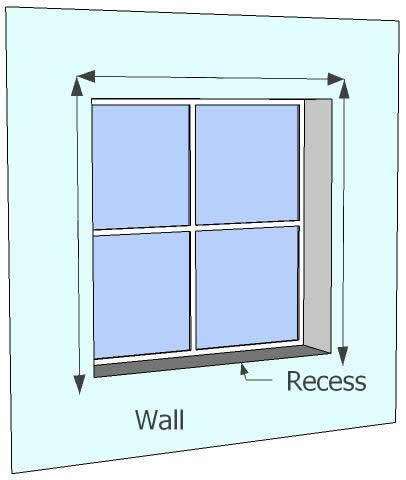
Used in situations where there is no architrave, or when you wish to reduce the amount of window area that will be covered by the stack up of the blind.
Width
No Architrave present
- Measure minimum of 50mm past each side of window opening at the top
With Architrave present
- Measure minimum of 30mm past edge of the architrave
Drop
- If fitting blind into plaster or concrete – measure minimum of 70mm above window opening to a minimum of 50mm below window opening, or to the floor
- If fitting blind into brick, measure from the top of the first brick to a minimum of 50mm below window opening, or to floor
No Architrave
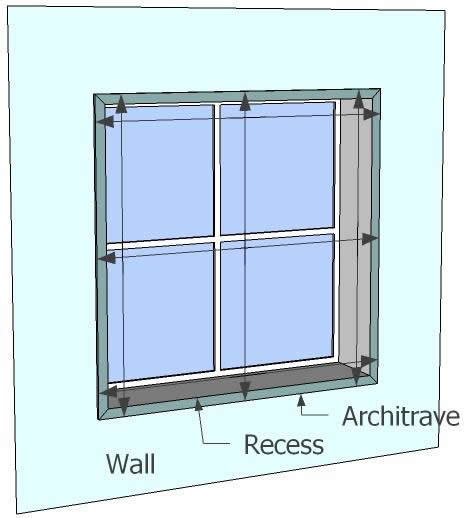
With Architrave
Butting Blinds
(Blinds fitting side by side)
- Apply the same measuring principles as for the Single Zebra Blind, and state on the paperwork that the blinds are ‘Butting together’. There will be a gap between the blinds
Corner Window
Inside Mount
Follow standard measuring principles and check that the reveal is deep enough to fit the Zebra Blind. Refer to the projection information in the specifications. Check for anything that may impede operation of blind e.g. window locks.
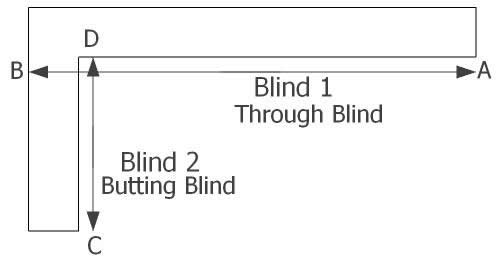
Option 1
(Through Blind with Butting Blind)
- Determine which window should be the main window for privacy, light block or aesthetic reasons. This will be the “through” blind. The gap between the blinds will sit in front of the window that the “butting” blind covers
- Measure at the front of the reveal
- Measure the width of Blind 1 from point A to B
- Measure the width of Blind 2 from point C to D at the front of the reveal. Both blinds will sit flush with the front of the reveal
Option 1
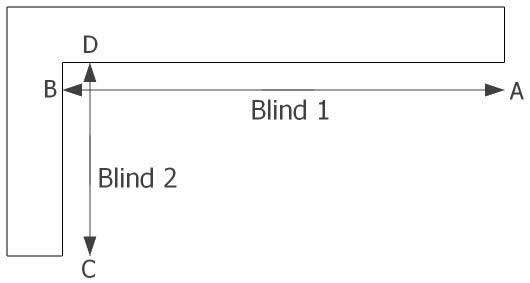
Option 2
Butting Blinds
- Measure at the front of the reveal
- Measure the width of Blind 1 from point A to B
- Measure the width of Blind 2 from point C to D at the front of the reveal. Both blinds will sit flush with the front of the reveal
Option 2
Note
- It is not advisable to situate the control chains or cords in the corner, as they will be difficult to access for operation
- Option one provides better light block, as there will be less gap where the ‘butting’ and ‘through’ blinds meet
Outside Mount
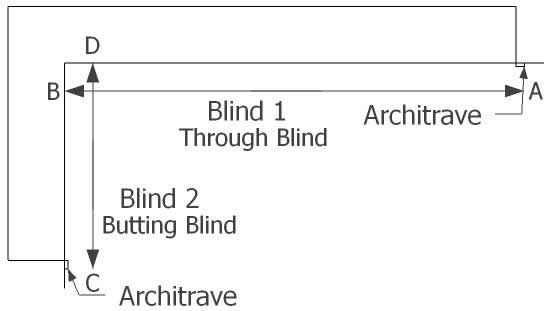
Option 1
Through Blind with Butting Blind
- Determine which window should be the main window for privacy, light block or aesthetic reasons. This will be the “through” blind, as the gap between the gap between the blinds will sit in front of the window that the “butting” blind covers
- Measure blinds 1 and 2 across the outside face of the corner window, Measure the width of Blind 1 from A to B by measuring from the outside edge of the architrave to the corner
- Measure the width of Blind 2 from C to D by measuring from the outside edge of the architrave to the corner
- Deduct the projection of Blind 1 from the Blind 2 width measurement. Refer to the Easy Reference Guide for product projections. Blind 2 will “butt” up to the front of Blind 1
Option 1
Option 2
Butting Blinds
- Measure Blinds 1 and 2 across the outside face of the corner window, along the surface to which the blinds will be fitted
- Measure the width of Blind 1 from A to B by measuring from the outside edge of the architrave to the corner
- Measure the width of Blind 2 from C to D by measuring from the outside edge of the architrave to the corner
- Both Blind 1 and Blind 2 require the projection to be deducted from each width measurement. Refer to the Easy Reference Guide for product projections
Option 2
Note
- Refer to measuring guide for Outside Mount Blind Fitting onto Wall if there are no architraves or if you require the blinds to fit onto the wall
- It is not advisable to situate the control chains or cords in the corner as they will be difficult to access for operation
- Option one provides better light block, as there will be less gap where the ‘butt’ and ‘through’ blinds meet
- Where architraves are present, measurements should be taken on the face of the architrave
Bay Window
Inside Mount
135 degree Bay Windows only
There will be considerable light gaps in bay window corners between the blinds, as the Zebra Blind fabric is narrower than the internal reveal measurement.
Follow standard measuring principles, and check that the reveal is deep enough for the headrail and bracket projections. Refer to the projection notes for this product in the specifications.
Width
- Measure blinds 1, 2 & 3 across the front of the reveal
- Measure from Point A to B
- Measure from Point B to C
- Measure from Point C to D

Note – This is the standard manner for fitting Zebra Blinds into a bay window. There are other options that may achieve increased coverage. You should discuss options with your installer
Outside Mount
135 degree Bay Windows only
The following instructions are to be used as a guide for Outside Mount Bay Window blinds. The most accurate procedure for measuring for this application is to install the brackets first, and measure from bracket to bracket.
Follow standard measuring principles. There will be considerable light gaps in bay window corners between the blinds, as the Zebra Blind fabric is narrower than the provided width measurement.
Width
- Measure blinds 1, 2 & 3 across the outside face of the bay window along the surface to which the blinds will be fixed
- Measure from Point A (edge of architrave) to Point B
- Measure from Point B to Point C
- Measure from Point C to Point D (edge of architrave)
- If no architrave is present, add 50mm to side window opening widths

Take the following deductions from these measurements:
- Blind 1
o Deduct 38mm total - Blind 2
o Deduct 75mm total - Blind 3
o Deduct 38mm total
Note – Recommended deductions include 1.5mm clearance per blind / per meet. Bay windows in older homes often have considerable timber framing and moulding at the top of window frames so it is critical that you inspect where the blinds are to be fitted before you take measurements.
Pelmets
Pelmets are generally ordered with the blinds they are to fit over. The factory will manufacture the pelmet based on the measurements supplied for the blind. Outside mount pelmets will be 10mm wider than the blind with returns supplied as standard. Inside mount pelmets will be supplied at the opening width measurement supplied. If a specific sized pelmet is required, please specify the outside length dimensions on your order form.
